🗂ㅤ인프라 | 네트워크/IaC
[Terraform] 간단 실습 및 예시 정리
나우(NAWOO)
2024. 12. 22. 16:10
main.tf 파일 생성
provider "aws" {
    region = "ap-northeast-1" #자신의 지역
    access_key = "자신의 ACCESS_KEY"
    secret_key = "자신의 SECRET_KEY"
}

# 새로운 VPC생성
resource "aws_vpc" "woo-example-vpc" {
    cidr_block = "10.0.0.0/16"
}
.tfstate 상태 파일
👩🏻💻 테라폼으로 클라우드 가상 머신 생성할 경우
- .tfstate 파일에는 가상 머신의 IP 주소나 크기, 다른 리소스와의 관계에 대한 정보들이 저장
- .tfstate 파일은 로컬 컴퓨터 또는 클라우드 컴퓨터에 안전하게 저장 (AWS 사용 시, 주로 S3에 저장)
variables.tf 파일
variable "instance_type" {
  description = "EC2 instance type"
  type        = string
}

variable "region" {
  description = "AWS region"
  type        = string
}

variable "availability_zone" {
  description = "AWS availability zone"
  type        = string
}
Provider
- [AWS] AWS에 접근하기 위한 access_key와 secret_key 인증 정보 제공
# AWS를 provider로 지정

provider "aws" {
  region = "us-east-1"
  access_key = "your-access-key"
  secret_key = "your-secret-key"
}
- [Azure]
provider "azurerm" {
  features = {}
}
🔗 Provider Docs
https://registry.terraform.io/providers/hashicorp/aws/latest/docs
Terraform Registry
registry.terraform.io
🔗 Provider 종류 (AWS, Azure, …etc)
https://registry.terraform.io/browse/providers
Terraform Registry
registry.terraform.io
Provisioner
- AWS의 인스턴스를 생성하고 인스턴스에 Nginx 웹 서버를 설치하기
resource "aws_instance" "example" {
  ami           = "ami-0c55xxxxxxxx1f0"  # 이미지 ID (운영체제 등이 들어있는 이미지)
  instance_type = "t2.micro"  # 인스턴스 유형

  provisioner "remote-exec" {
    inline = [
      "sudo apt-get update",                  # 패키지 업데이트
      "sudo apt-get install -y nginx",        # Nginx 웹 서버 설치
      "sudo service nginx start",             # Nginx 시작
    ]
  }
}
Resouce
- EC2 Instance
resource "aws_instance" "example" {
  ami           = "ami-0xxxxxxxxxe1f0"
  instance_type = "t2.micro"
  tags = {
    Name = "example-instance"
  }
}
- VPC
resource "aws_vpc" "example" {
  cidr_block = "10.0.0.0/16"
  enable_dns_support = true
  enable_dns_hostnames = true
}
Variables
- 사용 예시 1
- my_value 라는 변수를 variables에 저장
- AWS EC2 인스턴스 만들 때 variables에 저장된 my_value 사용하여 이름 설정
variable "my_value" {
  type = string
}
resource "aws_instance" "example" {
  name = var.my_value
}
- 사용 예시 2
variable "ami" {
  description = "The AMI for the instance"
  type        = string
}

variable "instance_type" {
  description = "The instance type for the instance"
  type        = string
}

resource "aws_instance" "my_instance" {
  ami           = var.ami
  instance_type = var.instance_type
}
Locals
- tags : tags 블록은 리소스를 식별하고 분류하는 데 사용할 수 있는 key-value 쌍이다.
locals {
  name = "my-instance"
  region = "us-east-1"
}

resource "aws_instance" "my_instance" {
  ami           = "ami-12345678"
  instance_type = "t2.micro"

  tags {
    Name = local.name
    Region = local.region
  }
}
Outputs
- AWS EC2 인스턴스의 퍼블릭 IP 주소를 output으로 정의
resource "aws_instance" "example" {
  ami           = "ami-0cxxxxxxxxfafe1f0"
  instance_type = "t2.micro"
}

output "public_ip" {
  value = aws_instance.example.public_ip
}
- output 명령어를 통해 확인
$ terraform output
public_ip = 11.234.22.394
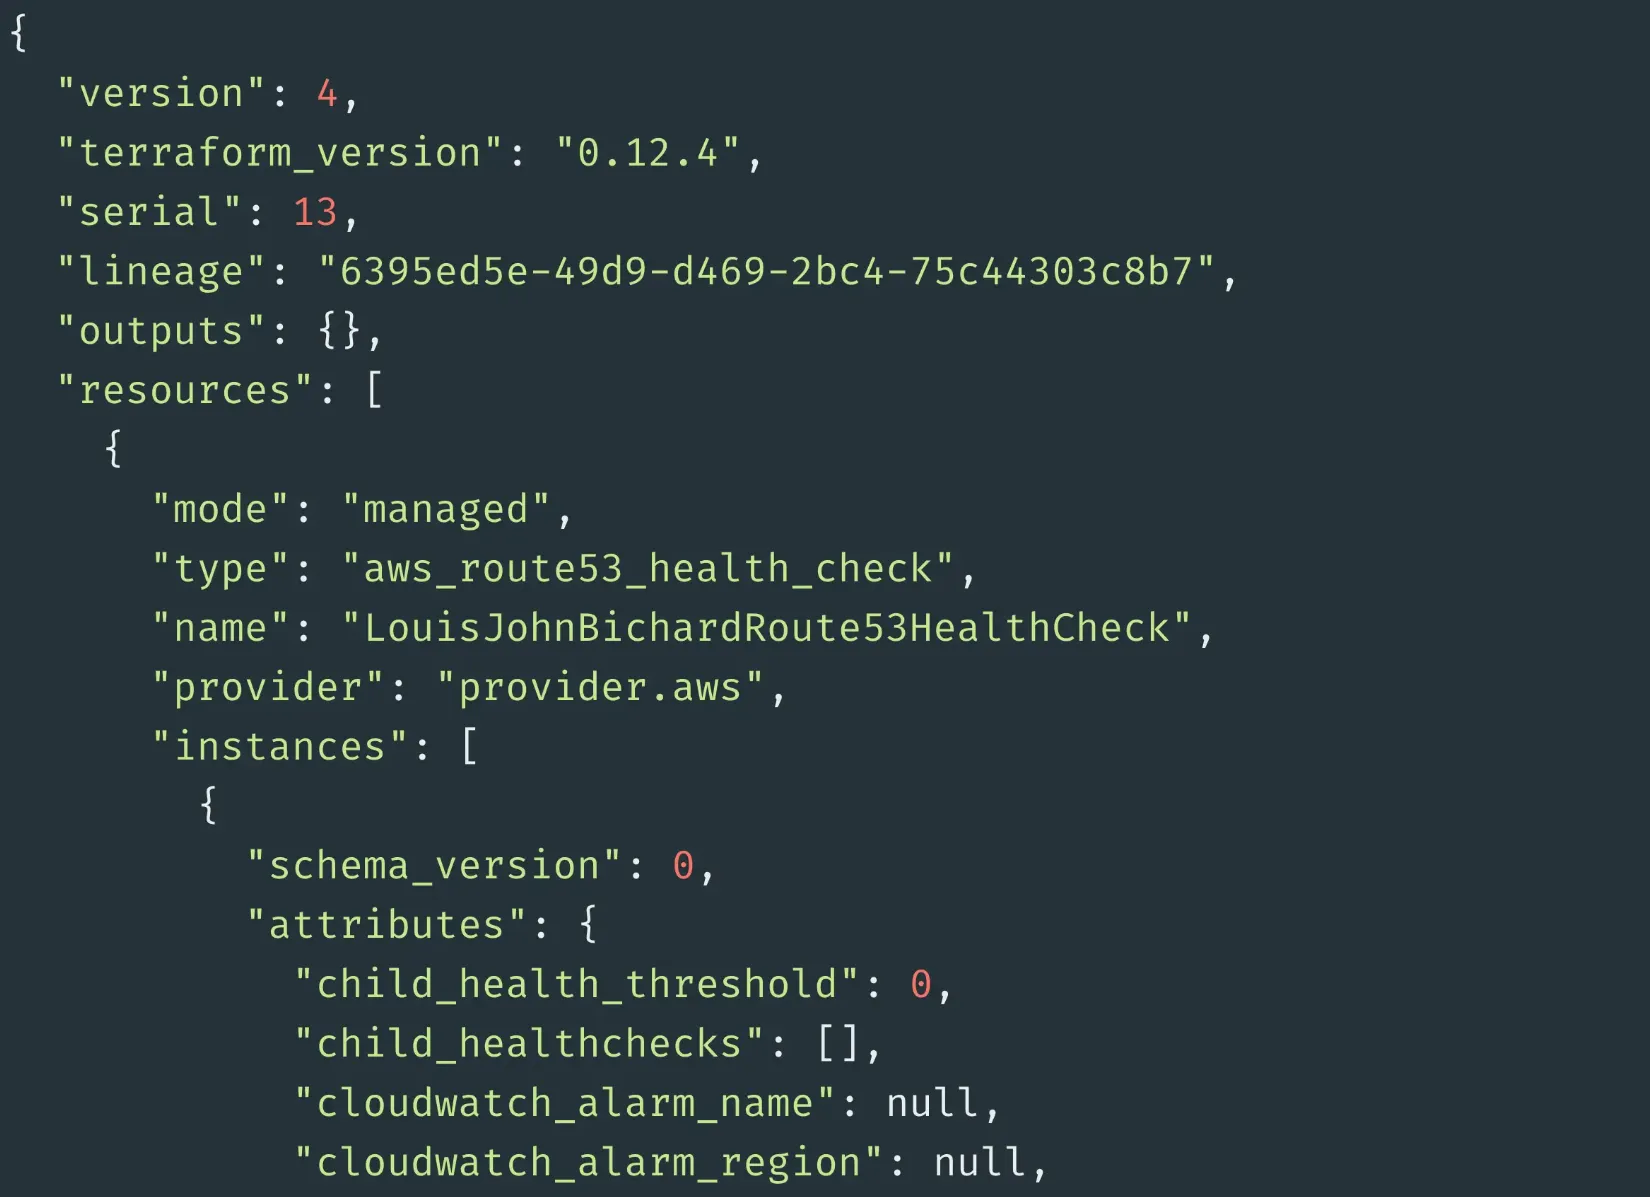
State
{
  "version": 4,
  "terraform_version": "1.0.2",
  "serial": 5,
  "lineage": "abc12345-defg-6789-hijk-lmnopqrstuvwx",
  "outputs": {},
  "resources": [
    {
      "mode": "managed",
      "type": "aws_instance",
      "name": "example_instance",
      "provider": "provider.aws",
      "instances": [
        {
          "index_key": "",
          "schema_version": 2,
          "attributes": {
            "ami": "ami-0c55xxxxxxxxx1f0",
            "instance_type": "t2.micro",
            "tags": {
              "Name": "example-instance"
            }
          },
          "private": "",
          "dependencies": []
        }
      ]
    }
  ]
}
Module
AWS로 클라우드를 만든다면 VPC, EC2와 같은 모듈을 만들 수 있다.
modules 디렉토리 아래에 VPC와 EC2 디렉토리가 있다.
/terraform
  ├── main.tf
  ├── variables.tf
  ├── outputs.tf
  ├── modules
  │   ├── vpc
  │   │   ├── main.tf
  │   │   ├── variables.tf
  │   │   └── outputs.tf
  │   └── ec2
  │       ├── main.tf
  │       ├── variables.tf
  │       └── outputs.tf
  └── provider.tf
- VPC 모듈 (modules/vpc/main.tf)
# modules/vpc/main.tf
resource "aws_vpc" "main" {
  cidr_block = var.vpc_cidr
  enable_dns_support = true
  enable_dns_hostnames = true

  tags = {
    Name = "main-vpc"
  }
}
- EC2 모듈 (modules/ec2/main.tf)
# modules/ec2/main.tf
resource "aws_instance" "example" {
  ami           = var.ami_id
  instance_type = var.instance_type
  subnet_id     = var.subnet_id

  tags = {
    Name = "example-instance"
  }
}
- 메인 Terraform 파일 (main.tf)
# main.tf
provider "aws" {
  region = "us-west-2"
}

module "vpc" {
  source   = "./modules/vpc"
  vpc_cidr = "10.0.0.0/16"
}

module "ec2" {
  source        = "./modules/ec2"
  ami_id        = "ami-0c55xxxxxxxxe1f0"
  instance_type = "t2.micro"
  subnet_id     = module.vpc.subnet_ids[0]
}
Data source
- AWS에서 특정 VPC의 정보를 가져오는 data 블록
data "aws_vpcs" "my_vpc" {
  tags = {
    Name = "my-vpc"
  }
}

output "vpc_id" {
  value = data.aws_vpcs.my_vpc.ids[0]
}
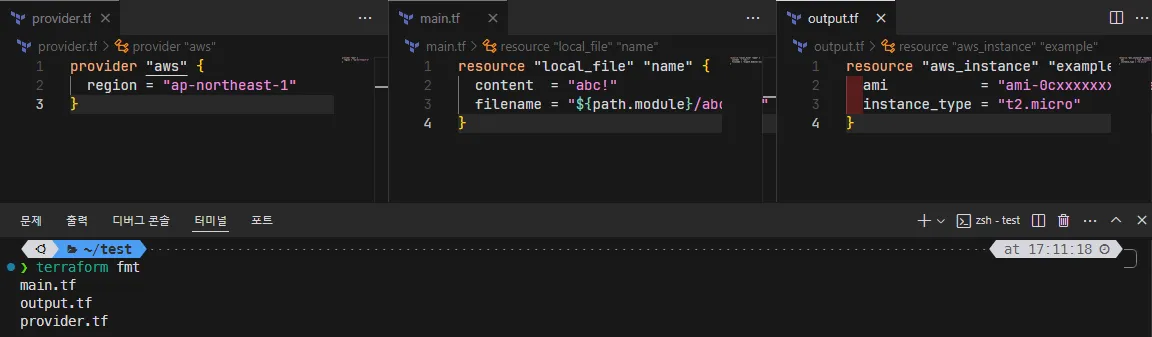
fmt
# 파일 구성
terraform/
├── main.tf
├── output.tf
├── provider.tf- fmt 실행 전 파일 상태

- fmt 실행 후 파일 상태
- terraform fmt 명령 실행 후 아래에 적용된 대상 파일이 표기된 것도 볼 수 있다.
[실습] Terraform init
<project_root>
├── .terraform
│   ├── plugins                       (생성되는 디렉토리와 파일들)
│   │   └── <platform>
│   │       └── <arch>
│   │           └── terraform-provider-<provider>
│   ├── modules                       (생성되는 디렉토리와 파일들)
│   │   └── <module_name>
│   │       ├── main.tf
│   │       ├── variables.tf
│   │       └── ...
│   ├── terraform.tfstate             (생성되는 파일)
│   ├── terraform.tfstate.backup      (생성되는 파일)
│   └── terraform.lock.hcl            (생성되는 파일)
├── main.tf
├── variables.tf
├── terraform.tfvars
├── outputs.tf
└── ...
PS > terraform init
Initializing the backend...
Initializing provider plugins...
- Finding latest version of hashicorp/aws...
- Installing hashicorp/aws v5.12.0...
- Installed hashicorp/aws v5.12.0 (signed by HashiCorp)
Terraform has created a lock file .terraform.lock.hcl to record the provider
selections it made above. Include this file in your version control repository
so that Terraform can guarantee to make the same selections by default when
you run "terraform init" in the future.
Terraform has been successfully initialized!
You may now begin working with Terraform. Try running "terraform plan" to see
any changes that are required for your infrastructure. All Terraform commands
should now work.
If you ever set or change modules or backend configuration for Terraform,
rerun this command to reinitialize your working directory. If you forget, other
commands will detect it and remind you to do so if necessary.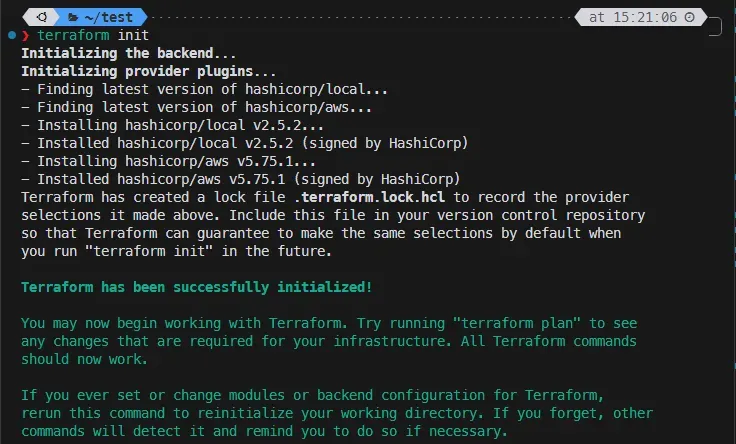
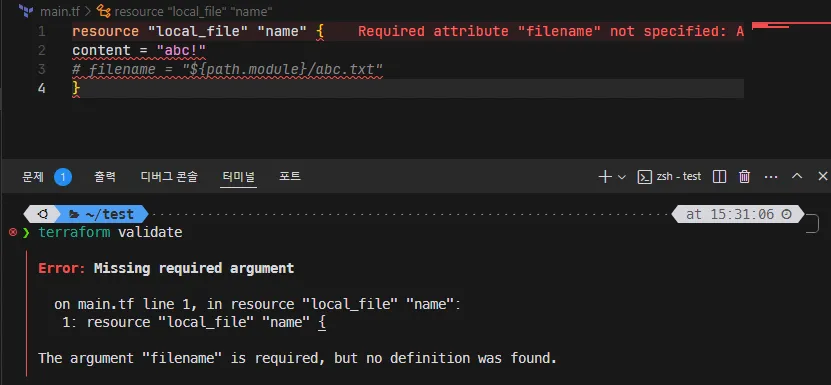
[실습] Validate
- 테라폼 구성의 유효성 확인 테스트
- 필수 인수 값인 filename이 주석 처리가 되었기 때문에 해당 정의가 없다는 메시지가 출력된 것을 볼 수 있다.
- -no-color
- Error의 빨간색 색상 표기가 없어진 것을 볼 수 있다.
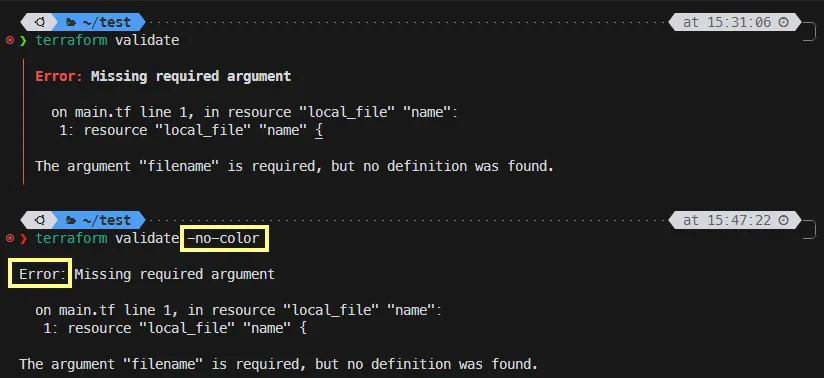
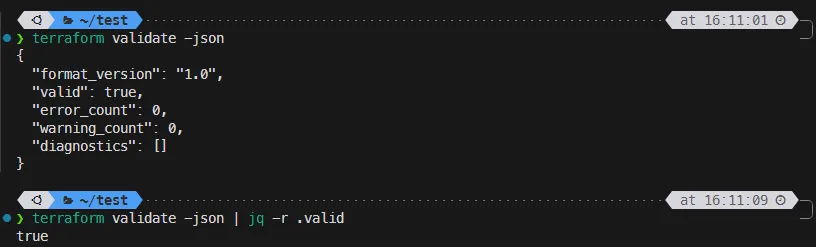
- -json
- jq 도구를 사용하여 -json 옵션을 추가해 JSON으로 출력된 테라폼 결과를 조회하는 예
[실습] Terraform plan
PS> terraform plan

Terraform used the selected providers to generate the following execution plan. Resource actions are indicated with the following symbols:
  + create

Terraform will perform the following actions:

  # aws_vpc.myvpc will be created
  + resource "aws_vpc" "myvpc" {
      + arn                                  = (known after apply)
      + cidr_block                           = "10.0.0.0/16"
      + default_network_acl_id               = (known after apply)
      + default_route_table_id               = (known after apply)
      + default_security_group_id            = (known after apply)
      + dhcp_options_id                      = (known after apply)
      + enable_dns_hostnames                 = (known after apply)
      + enable_dns_support                   = true
      + enable_network_address_usage_metrics = (known after apply)
      + id                                   = (known after apply)
      + instance_tenancy                     = "default"
      + ipv6_association_id                  = (known after apply)
      + ipv6_cidr_block                      = (known after apply)
      + ipv6_cidr_block_network_border_group = (known after apply)
      + main_route_table_id                  = (known after apply)
      + owner_id                             = (known after apply)
      + tags_all                             = (known after apply)
    }

Plan: 1 to add, 0 to change, 0 to destroy.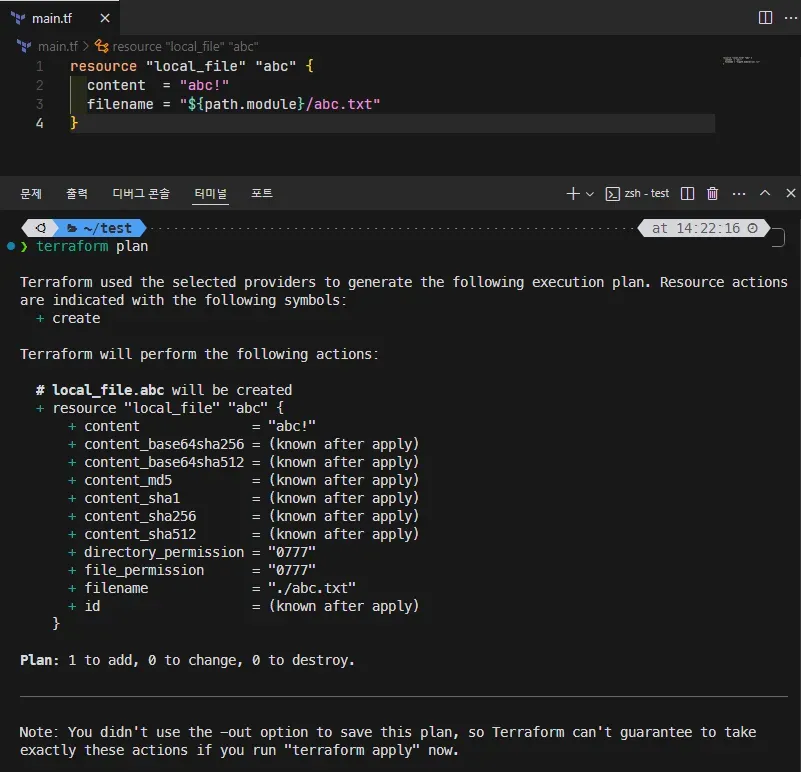
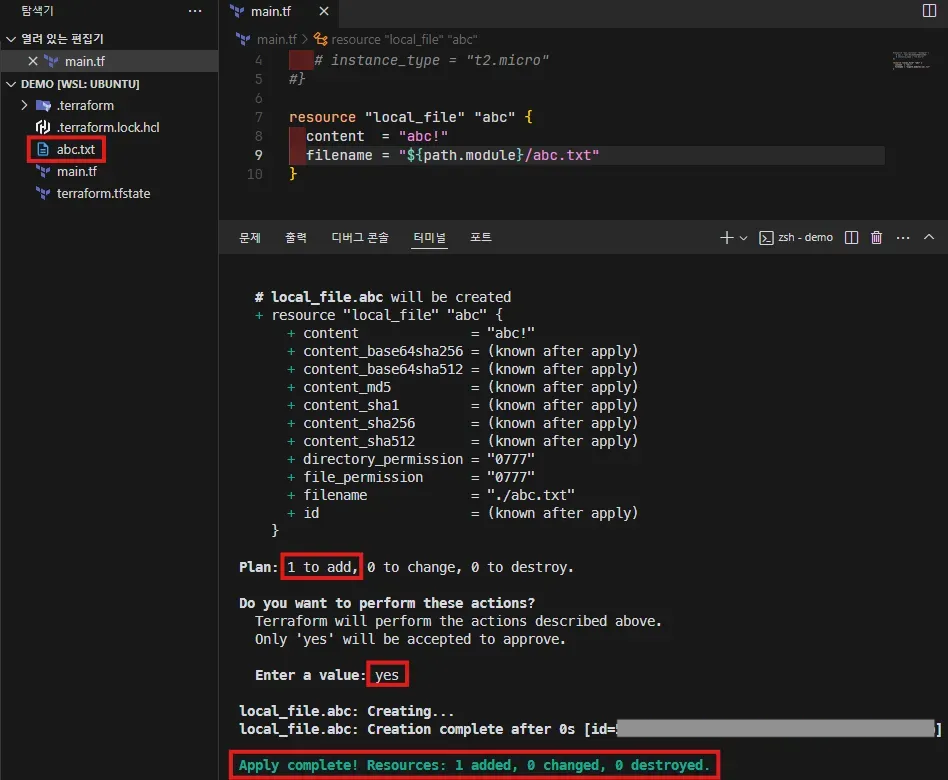
[실습] Terraform apply
PS > terraform apply

Terraform used the selected providers to generate the following execution plan. Resource actions are
indicated with the following symbols:
  + create

Terraform will perform the following actions:

  # aws_vpc.jibin-example-vpc will be created
  + resource "aws_vpc" "myvpc" {
      + arn                                  = (known after apply)
      + cidr_block                           = "10.0.0.0/16"
      + default_network_acl_id               = (known after apply)
      + default_route_table_id               = (known after apply)
      + default_security_group_id            = (known after apply)
      + dhcp_options_id                      = (known after apply)
      + enable_dns_hostnames                 = (known after apply)
      + enable_dns_support                   = true
      + enable_network_address_usage_metrics = (known after apply)
      + id                                   = (known after apply)
      + instance_tenancy                     = "default"
      + ipv6_association_id                  = (known after apply)
      + ipv6_cidr_block                      = (known after apply)
      + ipv6_cidr_block_network_border_group = (known after apply)
      + main_route_table_id                  = (known after apply)
      + owner_id                             = (known after apply)
      + tags_all                             = (known after apply)
    }

Plan: 1 to add, 0 to change, 0 to destroy.

Do you want to perform these actions?
  Terraform will perform the actions described above.
  Only 'yes' will be accepted to approve.

  Enter a value:

  ...(생략)

  Apply complete! Resources: 1 added, 0 changed, 0 destroyed.